So, you’ve decided that it’s time to do proper backups!
If you haven’t decided it’s time to do proper backups, you’re an idiot wrong. All drives, spinning, SSD or otherwise, have a spec called Mean Time Between Failures or MTBF. This is the average time a drive can be expected to work before it fails. Like brake discs on a car, they’re expected to wear out over time. Not fast, but they’re certainly expected to stop working.
Fortunately for you, my dear readers, I have the experience to help! Quoth my friend Tim:
You have, by far, the highest drive failure rate of anyone I know, and I work in a data centre with 1000s of them.
He’s quite right — over the past couple of years I’ve had two spinning disks and one SSD completely die on me. The spinning disks were in an always-on Mac mini and I finally cottoned-on to the fact that laptop drives aren’t designed for continuous running and the head generated therein, and the SSD succumbed to the dreaded 8MB bug that affects cheaper Intel SSDs, which isn’t as “fixed” as they claim.
Still, as a result I’ve gotten my backup regime to the point where the worst part of a drive failure is the effort of buying and replacing the broken drive, and the boredom of watching the progress bar slowly inch forwards as the restoration is done.
If my apartment building catches fire and all of my drives are lost, then the restoration process isn’t so smooth and I don’t have 100% data coverage, but I’ve got the important stuff covered.
I’ve also found a few tricks to ease the pain of restoring, which can be found below. A backup is useless unless it restores properly!
Local Backup
My local backup uses Time Machine to a Drobo connected to a Mac mini that’s at the other end of my apartment. The Drobo can survive a drive failure without breaking a sweat, and there’s a couple of fire walls between the two machines, so if a small fire breaks out with luck one of them will survive.
The Time Machine backup isn’t bootable, so if you’re in a situation where you’d need to carry on using your computer in as little time as possible, consider something like SuperDuper! or Carbon Copy Cloner to keep a live, bootable backup.
Offsite Backup: Online
For offsite backup, I backup my most important stuff (my Documents and Photos folders) online, which totals around 230Gb at the moment. Backing up everything isn’t very economical since it’d take too long, and I could live without most of my other stuff anyway, or get it from somewhere else.
My online backup uses Arq to backup to Amazon Glacier, which I just moved to using instead of Amazon S3. Amazon Glacier is cheaper than S3, but doesn’t have instant access to your data — you may have to wait a few hours between requesting your data and being able to download it. My logic is that if I’m in a situation where I need to recover using my online backup, having to wait a bit will be the least of my worries. Arq supports both S3 and Glacier just fine, so you can use whichever service you prefer.
There are also services that provide online backup solutions, such as CrashPlan, Mozy and many more. However, you have to trust them not to screw up (and going by a friend’s recent experiences, that’s not something you should do lightly). If they go out of business, bye-bye data. However, I trust Amazon not to go out of business any time soon, and Arq backs up using a documented format and there’s even an open-source command-line restoration tool on GitHub, so even if Arq stops being made, I can still get at my data.
Then again, these services do offer some great features such as mailing you a restoration DVD or hard drive if you have a slow internet connection — it’s up to you to weigh up the pros and cons of each method.
Offsite Backup: Offline
If you want everything safely offsite, or online backup isn’t feasible due to a slow internet connection (or both), you’ll want to start physically moving disks around. I don’t do this, but a good solution would be to have two separate backup disks and rotate them. For example:
- Have Time Machine (or whatever) backup to disk 1. Put disk 2 offsite somewhere, like in a locker at work.
- One week later, take disk 1 to work and bring disk 2 home with you.
- Have Time Machine backup to disk 2.
- One week later, take disk 2 to work and bring disk 1 home with you.
- Repeat forever!
As of Mountain Lion, Time Machine supports backing up to multiple disks properly, so swapping them out once a week will be seamless. With this setup, if your house catches fire and you lose everything, the worst case scenario is that your backup is a week behind.
Easing Restoration
For local restoration, there’s a few things you can do to make the restoration process a bit easier:
Getting the Operating System Running
If you have a modern Mac, it has a feature called Internet Recovery that allows the machine to download and install Mac OS X onto a completely blank drive.
However, if you don’t have a fast internet connection or if your Mac doesn’t have Internet Recovery (like my iMac), you can do what I did — I set up my Mac mini running Mac OS X Server (which is now a cheap add-on to Mac OS X from the App Store) to act as a NetInstall agent. It’s a really simple process — an assistant will ask you for a Mac OS X installer either from the App Store or an install DVD and convert it to a NetInstall image.
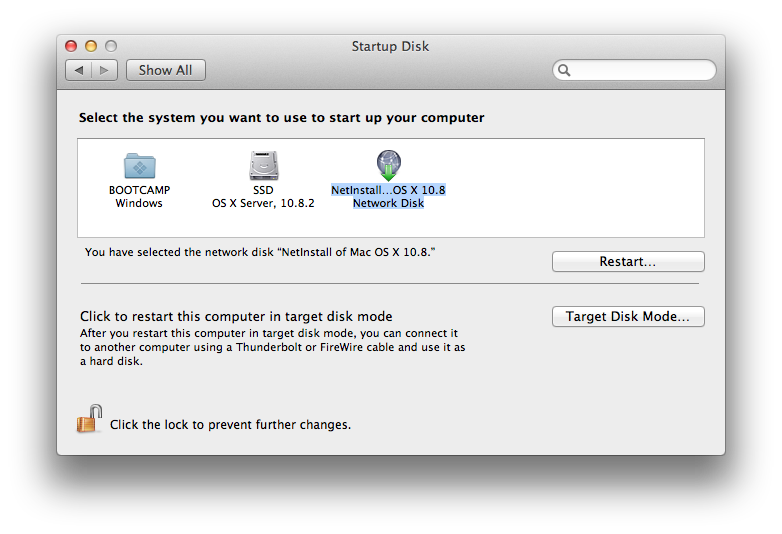
NetInstall images appear as any other startup disk would.
Once this is done, any Mac capable of running the Mac OS X version you’ve made an image of can boot up and install Mac OS X without having to hunt around for installation media. Simply connect your Mac to the same network as the server and hold Command+N as you switch it on.
Note: When installing over NetInstall, don’t be tempted to do it over WiFi. It’ll be slow and painful!
Double Note: NetInstall isn’t the same as NetBoot. NetBoot allows you to boot up a computer normally over the network, which isn’t the same.
Getting Yourself Up And Running
If you’re happy to leave your computer churning away for hours while your backup is being restored, simply have it restore “normally” through Time Machine or your backup software of choice. Your computer will be out of action for the duration of the restore, but it’s simple and your computer will be just like it was before this whole mess started.
However, if you’re like me, you’ll be impatient and will want to start doing stuff with your computer as soon as possible. Please note that this is a very advanced technique, and I’ve purposefully left the instructions vague to dissuade people from doing it. If you don’t know how to do any of the steps I detailed, you should just let your Mac restore fully through your backup software.
- Using your backup solution, restore as little as possible to get a functioning computer that includes your user account but not the contents of your Documents, Photos, etc folders.
- Log into your empty user.
- Start manually copying things from your backup into your home folder.
Using this technique, you can get up and running really quickly while your massive photo library restores in the background. However, it’s critically important that you restore your user from backup, as both the UID and UUID of the user on your computer must match the one in the backup otherwise you’ll get permissions problems.
The last thing to do is to copy the Library folder. This is invisible by default, and replacing your Library folder of the current user is a bad idea. Therefore, you need to:
- Copy the backed-up Library into your home folder with a new name, like “Library-New”.
- Reboot your Mac into Recovery Mode by holding Command+R as you reboot.
- In the Terminal in Recovery Mode, delete your user’s Library folder and move the “Library-New” into its place.
When you reboot normally, your user will be a mirror of what it was in the backup.
Last Words
The problem with backup is that it’s boring and a pain in the ass. What makes it worse is that computers are very good at hiding the fact that drives are, basically, starting to fail the day you buy them — they’re black boxes of electronics that people assume will keep working.
I’ve gone through enough drive failures to feel incredibly uneasy if my important data is in less than three places — my computer, my local backup and my online backup. Unfortunately, I only got this way by suffering data loss when a drive failed years ago and I had no backup.
If you’re reading this and haven’t already started backing up, I’m sure this advice and all other advice about backups will fall on deaf ears. However, once you do suffer data loss, I hope you come back to this article and that it’s useful for next time.
I’ll leave you with this final thought:
Close your eyes and imagine what you’d do if you went to switch on your computer and you found that it’s drives were completely blank. All of those thousands of hours poured into documents, all those photos of your friends and family, all gone. Forever.
If your answer is anything but “I’d buy a new drive and restore from my backup”, you’d better read this post again while buying external hard drives on Amazon.